![]()
Imagine creating a stunning wedding bouquet with fresh flowers that perfectly complements your special day. You’ll be guided through selecting the ideal color scheme, gathering necessary supplies, and crafting a beautiful arrangement. This DIY project allows for customization and cost savings, ensuring your bouquet matches your wedding theme flawlessly. Get ready to embark on this creative journey and bring your floral vision to life!
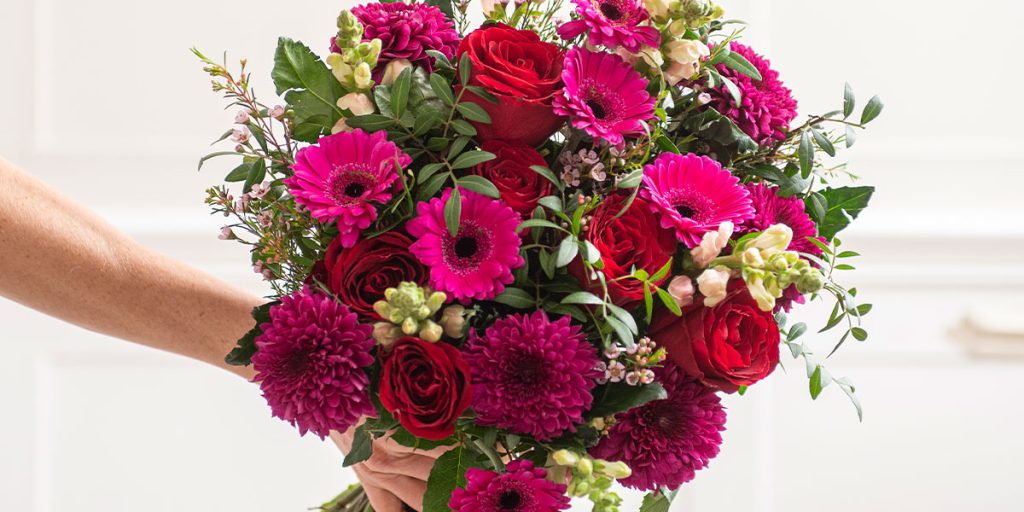
Selecting the Perfect Flowers
When choosing flowers for your bouquet, make sure to select 1-3 strong primary flowers with long stems like roses or peonies. Consider the flower color to match your theme coordination and evoke an emotional connection. Ensure proper stem trimming by cutting them evenly at around 10 inches in length. Don’t forget to incorporate greenery for a touch of freshness and texture within the arrangement. By paying attention to these details, you can create a stunning bouquet that not only looks beautiful but also resonates with the emotions and style you want to convey on your special day.
Gathering Essential Supplies
To assemble the bouquet, gather necessary supplies like ribbon, shears, and pearl-tipped pins. Here’s what you need to consider before putting together your stunning floral arrangement:
- Choosing color: Select a color palette that aligns with your wedding theme and evokes the desired emotions.
- Floral arrangements: Pick 1-3 primary flowers with long stems such as roses or peonies, along with secondary flowers like spray roses for a balanced look.
- Design inspiration: Look for design ideas that match your wedding themes and incorporate them into your bouquet creation process.
Remember these DIY tips while creating your bouquet to ensure it complements your special day flawlessly!
Preparing Your Fresh Flowers
Preparing your stems for the bouquet involves removing any foliage and thorns, trimming them evenly, and keeping some leaves for a touch of greenery. When it comes to flower selection, opt for primary flowers like roses or peonies with long stems and vibrant colors. Ensure that the color coordination matches your wedding theme to create a cohesive look. After trimming the stems to around 10 inches long, consider wrapping them with a ribbon that complements the bouquet’s hues. Adding decorative accents like pearl-tipped pins can elevate the overall appearance of your arrangement. Remember to maintain balance while assembling the bouquet and aim for a diameter between 8-13 inches for an aesthetically pleasing final result.
Crafting the Bouquet Arrangement
Crafting the arrangement involves selecting primary flowers with long stems like roses and peonies, adding secondary fillers, incorporating greenery for a nice touch, and wrapping the bouquet securely with ribbon.
- Floral Arrangement: Ensure a balanced mix of primary and secondary flowers.
- Color Coordination: Select colors that complement each other for a cohesive look.
- DIY Techniques: Use floral tape to secure stems together neatly.
When choosing your primary blooms, opt for varieties that stand out and create a focal point in your bouquet. Secondary flowers should enhance the overall design without overpowering the primaries. Remember to consider color harmony while arranging your blooms to achieve an aesthetically pleasing result. Lastly, secure everything tightly with ribbon using simple DIY techniques for a professional-looking finish.
Adding a Touch of Greenery
Adding greenery to your bouquet enhances its overall appearance and adds a nice touch of freshness. When considering greenery placement, think about using foliage accents to complement your primary flowers. Leafy additions can provide a natural and organic feel to your botanical embellishments. Don’t underestimate the impact of verdant touches in creating a balanced and visually appealing bouquet. Mixing different types of greenery can add texture and depth to the arrangement, making it more dynamic. Whether you opt for eucalyptus for a modern look or ivy for a classic touch, incorporating various shades and shapes of leaves will elevate the beauty of your bouquet. Remember, greenery plays a crucial role in framing your blooms and tying everything together seamlessly.
Ensuring Proper Stem Length
To ensure the bouquet looks cohesive, stems should be evenly trimmed to around 10 inches long.
- Trim all flower stems uniformly for a polished look.
- Select flowers with long stems like roses or hydrangeas for balance.
- Consider the overall aesthetics of the bouquet when arranging flowers.
When creating your floral arrangement, remember that proper stem trimming is crucial for achieving a professional finish. Careful flower selection and attention to bouquet aesthetics will result in a stunning centerpiece for your special day. Don’t forget to incorporate greenery strategically to add depth and texture to your beautiful creation!
Creating a Balanced Bouquet
When assembling your bouquet, remember to incorporate a mix of primary and secondary flowers for a balanced arrangement. Start by choosing a color palette that complements your wedding theme and evokes the desired emotions. Opt for 1-3 strong primary flowers like roses or peonies with long stems as focal points. Then, select secondary flowers such as spray roses to fill in gaps and add depth. Don’t forget to include greenery for texture and visual interest. Follow DIY techniques by arranging the flowers in a spiral shape, maintaining balance and roundness. Trim the stems evenly at the end for a polished look. With careful floral selection and color coordination, your bouquet design will shine on your special day!
Securing the Bouquet With Tape
Once you’ve gathered all your supplies, ensure to secure the bouquet with floral tape in a spiral shape for a professional finish. Here are some tips to help you perfect this step:
- Floral tape techniques: Start at the top of the stems and wind the tape downwards, overlapping slightly as you go.
- Ribbon wrapping styles: Choose a ribbon that complements your bouquet and wrap it neatly around the stems, securing with knots or bows.
- Tape vs wire methods: Floral tape is more flexible and easier to use than wire when securing the stems together.
Remember these suggestions while creating your bouquet to achieve a polished and elegant look before adding any finishing touches.
Wrapping the Bouquet With Ribbon
You should wrap the bouquet with ribbon that complements its colors and style to give it a final elegant touch. Choose a ribbon color that harmonizes with your flower selection, such as a soft ivory for a classic look or a vibrant gold for a pop of color. Experiment with different ribbon styles like satin for a glossy finish or lace for a romantic feel. When wrapping the ribbon around the stems, ensure it is secure but not too tight to avoid damaging the flowers. Consider ribbon alternatives like twine or burlap for a rustic touch. To enhance the bouquet further, add ribbon embellishments like pearls or crystals for an extra dash of glamour.
Adding Final Decorative Touches
To enhance the overall look of your bouquet, consider incorporating delicate accents like baby’s breath or small sprigs of greenery for added texture and visual interest.
- Ribbon embellishments: Wrap a beautiful ribbon matching your bouquet colors around the stems for an elegant touch.
- Floral accents: Add a few extra blooms in complementary shades to create a fuller and more eye-catching arrangement.
- Personalized decorations: Consider adding a charm or locket with initials or a special message to make the bouquet unique to you and your partner.
Facebook
Twitter
LinkedIn